Monday, August 8, 2022

Shaker Cards

 When I have lots of scrap pieces one way of using them up is making cards, I'm a paper saver and I always end up with tons of scrap paper.

I had a workshop this weekend and I prepared a couple of shaker card models with some retired paper packs.

The first one is a very simple but eye-catching card. Choosing the right pattern and colour is key, but as you can see is very simple.


I used a card base and envelope that measures 5 1/2" x 4 1/4". Then a rectangle of Blossom cardstock that measures 5 1/4" x 4" mats the patterned paper that is 5 1/8" x 3 7/8". For the polaroid frame, I used Cricut but can be done by hand cutting a 4" x 3 1/4" rectangle and then removing a 2.6" x 2.6" square leaving a 3/8" frame from the sides and top.

Then I used a 3" x 3" white cardstock for stamping and backing the polaroid window. I stamped a birthday cake and coloured it with the Triblend markers in Coral and I added the sentiment on the frame with a watercolour effect background to match the paper.


For the second card, I used the new Scalloped Circle Frame Thin Cuts for the shaker frame and then Circles thin cuts for cutting the other circles. I also used the Small Circle Shaker Window Foam + Acetate which makes life easier when you need to contain all the sequins in a circular shape.


For this one, I stamped a flower on the backing of the window shaker and coloured it with the tri-blend markers in Burt Orange and Light Green. I always stamp with Intense Black when I want to colour in as it doesn't smudge.


Friday, July 29, 2022

Hearts and patterns

Who doesn't love hearts? When I saw this pattern layout I needed to try it. It's very versatile and you can use any scrap paper you have around as you only need 10 squares sized 2"x2". Cool right? The original we can see it here.

I loved the wood grain look and I had an older pack of 'wood grain' so I went all for it but will look awesome with any patterned/plain combination.


I made a complementary page as I usually scrap in double layouts but definitely this can be a standalone page, a cover or backing page, whatever you want.


Materials you need:
  • 10 squares sized 2"x2" cut in half by the diagonal.
  • White cardstock 9 1/2" x 9 1/2" 
  • Contrasting cardstock 10"x10" (I used a dark wood grain, in the video they use glitter paper but any solid or contrasting paper would work).
  • 12"x12" base paper, I used a light wood grain pattern, but again, any patterned or solid of your choice will work.
  • scraps for details and embellishments are at your convenience.
I have double-matted my picture to make it pop and added some black details to tie everything.

Some details I added:
  • I have fake distressed the edges of my white cardstock using a Toffee inkpad, I just grabbed my inkpad and worked sideways along the edges, if I wanted more ink I just went flat against the paper. It gives a cool distress effect that adds some dimension.
  • I have stamped stitching lines all around my heart, this can be done by hand with a pen, or even with a sewing machine, I used blank ink to tie up some of the details and my photo mat.
  • As I'm a paper saver, when I need frames like this, I use a technique called gutting. What I do is I cut the inside 1/2 or 1 inch wider than I need, so I can save the inside for another project. For example, in this case, the outer frame, I need a 1" inch, so I grab my 12"x12" I put it on the trimmer at 2", place the blade at 2" and slide until I reach the 10" mark, then I turn the paper 90 degrees a do the same until I cut out the center, so I will have an 8"x8" leftover square. I did the same for the inner frame, this is a 10"x10" showing just 1/4", so I cut out a 1-inch wide frame saving another 8"x8" square.

The main advice for making this page is to mark where the center of your page is vertical, I draw a line with a pencil at the 6" mark once all the frames were in place.

Then place the triangles without gluing down anything. When you are happy with how they look start gluing them, I started from the bottom and worked upwards.

Have fun!


Friday, July 8, 2022

Yes is Autumn in the Southern Hemisphere!


Well, actually is already Winter down here but I was in an Autumn mood when I put this page in place 😁

I prepared this page as an easy kit for my July workshop, I love the paper, the colours, and the simple yet eye-catching of this layout.


I have used the sketch from page 32 of Make it from your heart vol.5 which is a great tool to reach for some inspiration, and the same sketch using different paper patterns and decorations results in a completely different design.


For this layout, I used Crisp Air paper suite for the patterned cardstock, and then I used Pine and Toffee colours for the solid ones from the coordinating cardstock pack and white as a base.


Stamping was done in Pine and Nectarine inks for the leaves and splatters and I stamped in Mocha for the small leaf on the round decoration as well as for the small titles of 'family' and 'real moments'. The stamps I used are mostly oldies but the splatter is called Brush Strokes (B1799). I use this stamp set a lot, just to give some personality to my layouts, I think is very versatile for any kind of page, as a detail, background, to emphasize a title, the possibilities are endless!


If anyone is interested in a kit for building this layout email me and I can make this happen!


Saturday, June 25, 2022

Quick card!

 I love making cards, I can spend hours designing, cutting, and decorating... but sometimes you don't have that time and you need to put something together quickly.

Having a Cricut has made things easy for this, in a matter of minutes, you can have something beautiful in place and ready to go.


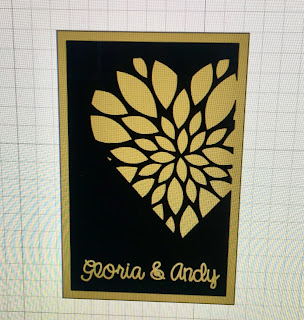
I was invited to a wedding anniversary celebration, I bought a present early and then it slipped from my mind... so the night before I put together this cute card, all made with basic shapes and free SVG from the Internet.


I used Close to my Heart cardstock in black, gold, and glitter gold and made both the card and the envelope. I also used the foil tool in gold from Cricut for the writing.


As a little advice, when you use medium to heavy cardstock, especially for the envelope, use high tack glue or tape as tends to unstick from the tension. And with glitter paper, I always use glue as tape doesn't do the work.

Saturday, June 18, 2022

Zip strips and scraps!

 Are you the same as me and always keep the tiniest amount of scrap paper? Where is the limit to discarding or keeping? 

I end up with lots of tiny pieces, all the zip strips that come with the papers and I keep adding them to my scrap box... so I wanted to do a little cleanup but bin cardstock is so painful...

I discovered in a folder some studio photos we took 7 years ago, yes I know 🙈, and I haven't included them in any of my albums. Because some were black and white and very neutral in the background I wanted colour. And with some of my zip strips and some scraps from my box of shame, I put this page in place.


I finished with a title done in black with the Cricut (font is Magnolia Sky), some bling and little stamps matching the strip above, looks like is a raining rainbow, don't you think?

I also used some stamps on white, colouring and fussy cut them, as this lovely butterfly:


It's a very simple layout, and you can put it together very quickly but at the same time is very happy and colourful and makes me smile.


Monday, June 13, 2022

It's been a while, but I'm back for good

 It's been a hectic time, little kids, new jobs, moving from rental to rental and finally building our own home. When life started settling, Covid hit and weirdness went to the roof. I lost my Mojo in every single aspect, but things are back on track, so I decided to commit to my paper crafting blog.

I've been using Close to my Heart products for a long time now, and finally, I decided to join as a maker as I love the products and I wasn't using anything else. 

I have recently started a scrapbooking group in my current suburb which I love, and what a better excuse to start writing again and share my little creations.

Our first meeting was this, we meet each other, talk about what we liked, everyone worked on their projects, shared ideas, actually, I just add photos to the pages I have been doing!

Look at the views we have in our new meeting place, stunning isn't it?


Stay tuned, I will start sharing regularly my ideas and creations.

Sunday, May 15, 2016

Scrapbooking month, lets celebrate!

Tiempo, tiempo, necesito tiempo! Tiempo para scrapear, tiempo para hacer fotos de lo que hago (lo poco) tiempo para publicar en el blog...

Time, time, I need time! Time for scrapbooking, time for taking pictures of what I Scrapbook (the few things I do) time for publish in the blog...

Aprovechando que Mayo es Scrapbooking month me he apuntado a algunas crops y así salgo de casa y hago algo, que con los mellis no tengo tiempo de nada, y es que en casa me da mucha pereza sacarlo todo para ponerme media horita de nada que es lo que me van a dejar...

As May is Scrapbooking month I'll be attending different crop sessions, this is the only way I have to do something, with the twins I don't have time to do anything. When I'm at home I barely have half an hour of freedom to scrap and it's not worth put everything out to such a short time...

Ayer fui a una crop de 6 horitas, a parte de unas cuantas paginas de mi olvidado álbum de los enanos me dio tiempo a hacer alguna tarjeta, y aproveché a hacer una para unirme al reto de 3 Flowers, "A embosarlo todo se ha dicho".

3flowers retos de tarjetas:"A embosarlo todo se ha dicho"

Yesterday I went to a 6 hour crop session, I scrapbooked some pages of my littlies never ending album and I could do some cards also (yay!).  With one of the cards I'm participating in the 3 Flowers, "A embosarlo todo se ha dicho" challenge.


Mi tarjeta solo tiene embossing frío y caliente, para el embossing en pasta no tenía material, así que como menos es nada allá va.

My card only has cold and hot embossing, I didn't have the materials for the embossing paste. 

La verdad es que últimamente uso mucho Close to My Heart, que es un tipo Mary Kay pero de Scrap, mi amiga y compi de trabajo Nina es consultora y me tiene enganchada, todo lo que venden está perfectamente coordinado, las tintas, con los papeles, los sellos... Creo que aun no están en España, una pena porque es todo super kuki, pero bueno, menos cháchara y al lío.


Lately I love to use Close to My Heart, it's a brand like Mary Kay but about Scrapbooking instead of cosmetics. My friend and colleague Nina is a consultant and I'm addicted. Everything they sell is perfectly coordinated, the inks, the papers, the stamps... I think they are not Spain yet, what a pity because everything is amazing.

Es una tarjeta sencilla, pero a mi parecer muy limpia y elegante. Tiene una base que enmarca la tarjeta en color "sorbet" que coordina con la tinta y algunas de las flores. La tarjeta base está "embosada" en frío con una máscara circular en el centro y alrededor flores y hojas estampadas y cortadas con Cuttlebug (troqueles a juego con los sellos). El sentimiento está estampado en un gris claro que se llama "whisper" y las ramas y hojas negras llevan embossing caliente en dorado. Las flores y hojas estan colocadas alrededor de la máscara circular, algunas levantadas con foam adhesivo otras planas para darle relieve. Y bueno, mis brillitos particulares.

It's a simple card, I think it's neat and elegant. It has a base in "sorbet" color cardstock that makes the card pop. This same color is also used in the ink and cardstock of some flowers. The base of the card is cold embossed with a central and circular mask, all around the circle there are flowers and leafs stamped and cut with the Cuttlebug (it's a pack with thin cuts and coordinated stamps). The sentiment is stamped in light grey ink called "Whisper" and the black leaves and branches are hot embossed in gold. The flowers and leafs are all around the sentiment, some of them raised with sticky foam. And I added some strass (which I always love).